Wednesday 29 May 2013

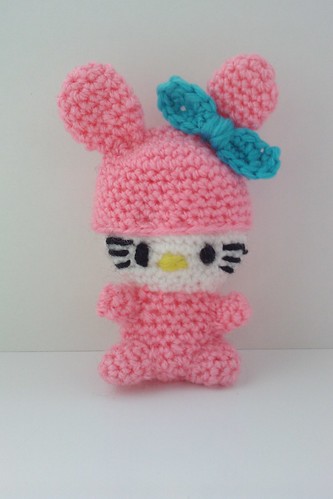
CLASSIC STYLE SUN HAT

PATTERN 

AGE 2-10YEARS

A CLASSIC DESIGN FOR BOYS & GIRLS.


This pattern works up quickly, it is fun and easy to make! It is a beginner level, if you are new to crochet this pattern is for you!


 ©HAYLEES HATS
All rights reserved to Haylee Hibbert of Haylees Hats. Haylee Hibbert is the designer and creator of this crochet pattern. This pattern is not to be sold anywhere, in any shape or form. Haylee Hibbert of Haylees Hats owns all rights to this pattern. You can sell items you have made from this pattern but the pattern itself is not to be taken or copied. It is not to be placed anywhere on the internet or printed anywhere else for sale. It is to remain free and available on this blog and this blog alone. 

MATERIALS
3MM Crochet hook
2 x 50g colours 8 ply DK or worsted weight 100% cotton yarn
Scissors
Yarn needle
Button, Ribbon (optional)

ABBREVIATIONS
SS - Slip Stitch
CH - Chain
DC - Double Crochet (Tr - treble)
* - Repeat from * to *
CC1 - Colour 1
CC2 - Colour 2
St - Stitch
SC - Single Crochet (Dc - Double crochet)

NOTES
This pattern is worked in rounds, beginning chain does not count as a stitch throughout. Pattern is written in American terms. Conversion in abbreviations is highlighted in pink.

INSTRUCTIONS
Start with CC1 make a slip knot and CH4 ss to join.

RND 1
CH3, 11 DC into ring SS to join (11 St)
RND 2
CH3, 2 DC in each St around, Join CC2 with a SS. (22 St)
RND 3
CH1, *1 SC in 1st st, 2 SC in next* Join CC1 with a SS. (33 St)
RND 4
CH3, * 1 DC in next 2 St, 2 DC in next* Join CC2 with a SS (44 St)
RND 5
CH1, SC in each St around, Join CC1 with a SS (44 St)
RND 6
CH3, *1 DC in next 3 St, 2 DC in next* Join CC2 with a SS (55 St)
RND 7
CH1, *1 SC in next 4 St, 2 SC in next* Join CC1 with a SS (66 St)
RND 8
CH3, *1 DC in next 5 St, 2 DC in next* Join CC1 with a SS  (77 St) 
RND 9
CH1, *1 SC in next 6 St, 2 SC in next* Join CC1 with a SS (88 St) 
to make hat smaller to fit age 2, 1 SC in each St around (77St) 
RND 10
CH3, DC in each St around Join CC2 with a SS (88 St)
RND 11
CH1, SC in each St around Join CC1 with a SS (88 St)
RND 12-23
Repeat rounds 10&11 six more times  and break away CC2 
BRIM
working in back loops throughout.
RND 24
With CC1 CH3, *1DC in next St, 2 DC in next*  Join with a SS. (132 St)
RND 25 & 26
CH3 1 DC in each St around Join with a SS. (132 St)
Fasten off and weave in ends.
EMBELLISHMENTS
you can use a button to the front of the hat which can be used to fasten the front of the brim to hold it up. The DC stitches can be used as a button hole.
You could weave a ribbon in and out through the DC Stitches for a pretty girly look.
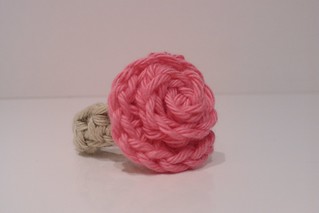
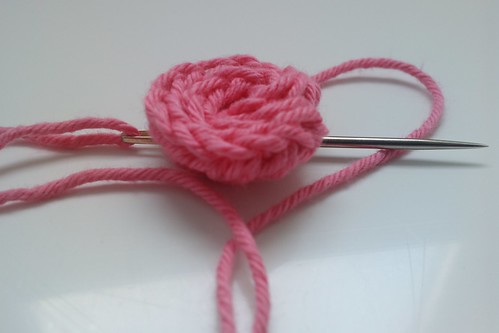
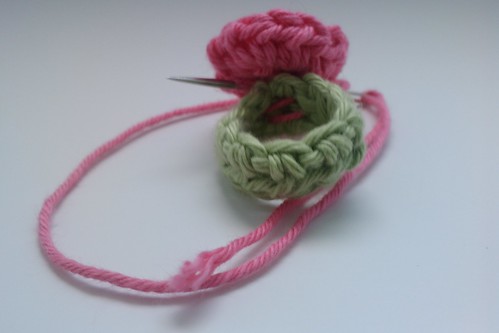
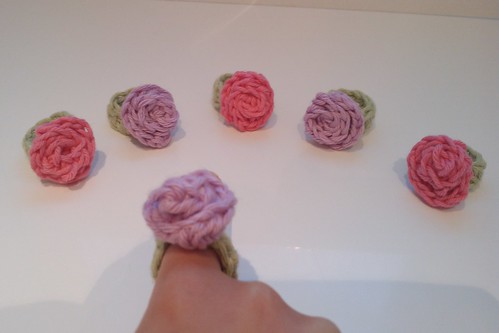
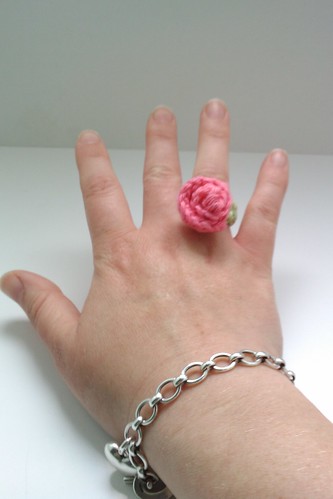
You can also add crochet flowers or rosettes. I will add the pattern for the large rosettes shown on the hat in my next blog post.

Please feel free to share this blog link using the share icon buttons below. Share on facebook, twitter, google plus, tumbler and pinterest. I am sure fellow crocheters would enjoy this pattern too! 
I would love to see your finished hats, I am on Ravelry under hayleescrochet, add your finished project on your Ravelry.


Friday 29 March 2013

Beautiful Butterfly Crochet Hat Pattern

BEAUTIFUL BUTTERFLY 
CROCHET HAT PATTERN

Sizes age 2years and 3-10years

written and designed by
Haylee Hibbert


This pattern must not be taken from this blog, it must not be sold or the text copied or pasted anywhere else on the internet. I have worked very hard on this design, perfecting and writing it. Please feel free to direct fellow crocheters to this blogpost via the link above. You may by all means sell your finished product you have made by using this pattern.
All rights reserved to Haylee Hibbert.

Pattern written in American terms
Materials
4.00mm crochet hook
5.00mm crochet hook
2 colours of baby arran weight yarn
1 colour of double knit DK yarn
2 pearl beads
2 pipe cleaners 15cm length
lead pencil or colouring pencil
darning needle
thread and sewing needle to sew on beads
scissors

Abbreviations
English terms conversion highlighted in pink
Ch - Chain
Sl St - Slip Stitch
DC - Double crochet  /Tr -Treble crochet
PC - popcorn stitch
Hdc - Half double Crochet /Htr- Half Treble
Sc- Single Crochet /Dc- Double crochet
St - Stitch
* * repeat from * to *
CC1 - Colour 1
CC2 - Colour 2
CC3 - Colour 3

Pattern Notes
I used 2 baby arran weight yarns because I did not have any double knit weight in all the colours I needed. I am sure this will work out just as well with all 3 colours in DK or worsted weight yarn. I used CC1 & CC3 as my aran weight and CC2 as my DK.
I will be doing a video tutorial for this hat as soon as I find the time. Please familiarise yourself with the popcorn stitch. There are tutorials demonstrating this stitch on youtube. 


Hat 3-10Years
With CC1 make a Slip knot Ch4 Sl St to form a ring

Rnd1
CH2 14DC into ring Sl St to join (14DC + Ch2)

Rnd2
Ch2, 2DC in each St around Sl St to Join (28DC +Ch2)

Rnd3
Ch2 *1DC in 1st st, 2DC in next*  Sl St to Join (42DC +Ch2)

Rnd4
Ch2 *1DC in next st, 5DC in next sl st to 1st of the 5DC* Sl St to join           (21PC, 21DC + Ch2)

Rnd5
Ch2 *1Dc in next st, 2DC in next* Sl St to join with CC2 break away CC1   (64DC +Ch2) 

Rnd6-10
Ch2, 1DC in each st around Sl St to Join. On Rnd 10 join with Sl st using CC3 and break away CC2 (64DC +Ch2)

Rnd11-15
Ch1, 1hdc in each st around Sl St to Join. On Rnd 15,  Sl St to Join with CC1 and beak away CC3. (64Hdc +Ch2)

Rnd16 
Repeat Rnd4 fasten off and weave in ends. (32PC, 32DC +Ch2)

Hat 2Years
Follow above pattern ending at Rnd4

Rnd5 
Ch2 *1DC in next 3 St, 2DC in next* 1DC in last 2 st Sl St to join with CC2 break away CC1 (53DC + Ch2)

Rnd6-10
Ch2, 1DC in each st around Sl St to Join (53DC +Ch2) on Rnd10 Join with Sl St using CC3 and break away CC2

Rnd11-15 
Ch1, 1Hdc in each st around Sl St to Join. On Rnd15 Sl St to join using CC1 and break away CC3. (53Hdc + Ch1)

Rnd16 
Repeat Rnd4 placing 1 Dc and 1PC in last st. Sl st to join, fasten off and weave in ends. ( 27PC, 27DC +Ch2) 

To make a 3D butterfly
Materials
4.00mm Crochet hook
Arran weight yarn for main design and DK for spots/circles
yarn stitch marker (I use a long strand of yarn or a bobby pin)
2 pearl beads
2 pipe cleaners 15cm length
lead pencil or colouring pencil
darning needle
thread and sewing needle to sew on beads
scissors

3D Butterfly Pattern
Using 4.00mm Crochet hook make a Slip Knot.
Make 2

Rnd1
Ch16, 1Sc in 2nd Ch from hook and in each of the next 13st, 2Sc in last. Turn work slightly still working with the right side facing you and Sc in each of the next 14st, 2Sc in last. Place stitch marker, you will be working in continual rounds.

Rnd2
2Sc in next st, Sc in next 13 st, 2Sc in each of the next 2 st, sc in next 13 st, 2Sc in next, Sc in last.

Rnd3
Sc in next st, 2Sc in the next, Sc in the next 13 St, 2Sc in the next, 1Sc in the next 2St,  2Sc in the next, Sc in the next 14 St, 2Sc in the next St, Sc in the last st.

Rnd4
1Sc in next 2 St, 2Sc in next, 1Sc in the next 14 St, 2Sc in the next, 1 Sc in the next 3 St, 2Sc in the next st, 1Sc in the next 14 St, 2Sc in the next, 1Sc in the next 2St.

Rnd5
1Sc in next 2 St, 2Sc in next, 1Sc in next 14St, 2Sc in next, 1Sc in next 5st, 2Sc in next, 1Sc in next 16St, 2Sc in next, 1Sc in next 3 St.

Rnd6
1 Sc in next 3 St, 2Sc in next St, 1Sc in next 15St, 2Sc in next, 1Sc in next 6 St, 2Sc in next, 1Sc in next 16 St, 2Sc in next, 1Sc in next 4st.

Rnd7
1Sc in next 3St, 2Sc in next, 1Sc in next 16St, 2 Sc in next, 1Sc in next 8 St, 2Sc in next, sc in next 16 St, 2Sc in next, 1SC in next 5 St, Miss 1 and Sl St in next , fasten off and weave in ends.


To make Spots
Make a magic ring Ch1, 7Sc in ring Sl St ti 1st Sc pull center strand to tighten ring and fasten off leaving enough tail end to sew the spot to the butterfly. Weave in centre strand and break away.

To assemble the butterfly
Place the 2 oval shaped piece with rights side facing in and wrong sides facing you. Hold the 2 pipe cleaners together and Sc over them joining the centres of the oval pieces togther. Leave about 3cm over hang of the pipe cleaner to make the antenna. Sc all the way down the middle joining the two oval shapes together crocheting over the pipe cleaners. fasten off leaving a long tail end maybe about 30cm. You can use this to create a draw string to divide one oval shape to form two wings. First weave in ends were you fastened off on Rnd7 on both pieces. To create a draw string with back of work facing you, sew in a 'U' shape and pull tight then latch stitch to centre to secure. Repeat this for the other oval shape. (If you do not  understand this I will be doing a video tutorial as soon as possible)
To shape the antenna, wrap the pipe cleaners around the pencil.
Sew on the spots and beads and sew the butterfly to the hat.


Monday 21 January 2013


WARM & COSY 
Hot water bottle cover

hot bot.1
All rights reserved. Please do not copy and paste this pattern anywhere else on the Internet. Please only share the link below
http://facebookhayleeshats.blogspot.com/2013/01/warm-cosy-hot-water-bottle-cover.html 
to direct fellow crocheters to this blog alone. You are welcome to sell your finished items made from this pattern. Please feel free to share and show your finished bottle cosies here on my facebook group I would love to see your finished projects. This pattern is free, please do not sell it anywhere it must never be taken from this blog. Thank you for your understanding and cooperation.


Lets get started, grab your hook & yarn. 
Lets party!

Materials: 
4.5 MM crochet hook
Tapestry Needle
I ball of fine weight yarn 4ply weight UK (fine 2 American). (I used yarn paradise angora design) click here to view the yarn I used.
Scissors
1 small snap fastener
sewing thread and needle

Stitches used and abbreviations (American terms): 
(English terms are high-lighted in pink)
CH - Chain (ch)
DC - Double crochet (tr: Treble crochet)
V stitch -  dc, ch 1 , dc in same stitch (tr, ch1, tr in same st)
SK - skip a stitch
SC-Single crochet (dc: Double crochet)
FPDC - Front post double crochet (FPTR: around the post and treble crochet)
st - Stitch/es
sl st - Slip stitch
* * - Repeat from * to *
Back loops - the stitch loop furthest away from you. do not go through both parts of the stitch just the back loop. This gives a ribbed effect.

Pattern Notes:
This hot water bottle cosy will fit a 2 litre standard size bottle, it is worked in one piece. It has a draw string closure made by crocheting a long chain. It also has a snap faster for the top (this is optional). On row 5 make sure you place your hook under both rows between the scales to secure them down together. (I will be making a video tutorial soon. A fellow crocheter got stuck on the first two rows so for now all I have is a talk through the first two rows click here if you would like help) The pattern below is written in American terms. I have shown the conversion to the English/American stitches above.

Difficulty
Intermediate. I recommend familiarising yourself with the crocodile stitch. 

To start Ch71 turn
Row 1: DC in 4th ch from the hook and each st across (67dc) turn
Row 2: CH3 *SK 2 ST ,V Stitch in next st*repeat to end and dc in last st turn (22 v stitch and 2 dc) turn
 You will now start to make the crocodile stitch using the v stitch as a base for your stitches. You will be working around the post of the first part of the V stitch chaining 1 for the point of the v stitch then work your way back up the other side of the 'v' of the v stitch.
Row 3: ch 1 *5 fpdc ch1 and work 5 fpdc up the other side of the v of the v stitch. sk next v stitch* repeat to end sl st in last v stitch and last 2 st. turn
Row 4: repeat row 2 working v stitches into each of the v stitches of previous v stitch row. Turn
Row 5: sl st in first 2 st *5 fpdc, ch1, 5fpdc, sk next v stitch* sl st in 2nd ch of the ch3 or previous row. Turn
Row 6: Repeat row 2
Row 7: Repeat row 3
Row 8: Repeat row 2
Row 9: Repeat 5
Row 10:  Repeat Row 2
Row 11: Repeat row 3
You should now have 5 rows of scales and 5 rows of v stitches
Row 12: Ch 3 dc in v stitch * dc in next 2 st dc in v stitch * repeat across dc in last st (67 dc & 1 ch3). Turn
WORKING IN BACK LOOPS 
Rows 13-17: ch3 and dc in each st across 67dc 
You should now have 6 rows of dc and a ribbed effect
Row 18: Repeat Row 2
Row 19: Repeat row 3
Row 20: Repeat Row 2
Row 21: Repeat row 5
Row 22: Repeat row 2
Row 23: Repeat row 3
Row 24: Repeat Row 2
Row 25: Repeat Row 5
Row 26: Repeat row 2
Row 27: Repeat row 3

You should now have 5 rows of scales and 5 rows of v stitches
Rows 28- 43: Repeat rows 12 -27
To finish crochet a sc edging to give it a neat finish. sc all the way around evenly making sure the front of your work is facing you, placing 2sc in each corner. When you come to sc across the top, sc as row 12 from * to * fasten off leaving a long tail end. The way I measured my tail end was by placing the tail end across one side and then the bottom of the cosy (in an 'L' shape) add a little extra then cut off...this will give you enough to sew it together. Fold it in half length ways making sure the top (the last row your crocheted) is facing up towards you and the back of your work facing out. Sew in an 'L' shape down the side and bottom. Top Tip!! Line up your crocodile stitches by using a clothes peg. This will ensure that you are sewing the seam symmetrically and evenly. Weave in your tail ends. I single crocheted over my starting tail end so I only had one tail end to weave in.
Draw string: I cut about 3 meters from the ball and folded it in half to double it up then chained along until I reached the end.  Using a tapestry needle weave it in and out through your last row of dc ( I sang in and out the dusty blue bells as I done this bit! ) and tie it around the neck of the bottle.
Tassel's (make 2) : I used a business card and wrapped the yarn 10 times around the card then cut and placed them over my hook centred and then latch hooked it through the two ends. You will notice there are 2 strands separated (the starting draw string ends)  pull these through the centre of the tassels to tidy it up and then snip the tassels so they are both equal lengths.
Snap fastener (optional): I sewed with a needle and thread a snap fastener to the top to secure  the sides over the  top of the bottle. This was for looks alone as I did not like to see any part of the hot water bottle, it  will make it tidy and  presentable.

CONGRATULATIONS
Enjoy your beautiful hot water bottle cosy!!

Designed and written by Haylee Hibbert of Haylees Hats


Sunday 8 July 2012

500 youtube subscriber give-away!

The give-away item will be a crochet bag ('purse' in american terms). Details of the bags can be found on my youtube channel here

To enter comment on the youtube video in the description box. 

For an extra entry please leave a comment below in the comments box with your youtube channel name.

 I will announce the winner in two weeks time.

If you comment on both youtube and this blog you will gain 2 entries.

Good luck!

Saturday 12 May 2012


Cotton Rose ring 
Pattern by Haylees Hats 

My crochet rose ring

Materials
 2 shades of 100% cotton 4 ply. 1 shade green and other shade rose colour of your choice.
Tapestry needle
scissors
3.00mm Hook
Stitches 
(Written in american terms)
HDC - Half double crochet
Ch - Chain
st - Stitch
Step 1
Starting with a slip knot Ch12 (to make a larger band Ch15)
Step 2
HDC in 2nd ch from hook and each st to end. ( 11HDC) for larger size (14HDC) fasten off leaving a long tail end to sew together the two ends to create a band. Insure you weave in your beginning tail end first.Weave in tail end and break away.
Step 3 (making the rose)
Start with a slip knot CH11
2HDC in 2nd ch from hook and each st to end (20HDC)
coil to make a rose shape and sew together to prevent it from uncoiling. Next sew the rose onto the band at the join (this is where you joined the two band ends together) Once your rose is secured to the band, weave in the end and break away.
Congratulations you have made your beautiful cotton rose ring. Enjoy!
Top Tip!
Keep your tail ends and use this to tie your ring to a card. This will look great as a gift or will look presentable for your customers.
You may sell the rings you make from this pattern. Please put a link with any photos of your ring to this blog pattern. This will help fellow crocheters to find this pattern and any other free patterns I create. This pattern may not be reproduced or sold. It is free and designed and written by Haylee Hibbert of Haylees Hats. 
Thank you.
Photo Tutorial

CH12
IMAG3839


11HDC

IMAG3840

weave in beginning tail end.


IMAG3841


Join the two ends sew together to form a ring.

IMAG3842

Weave in end and break away.
 IMAG3843


20HDC

IMAG3845

Coil together to make a rose shape and sew together to prevent it from uncoiling.
IMAG3847

sew the rose to the band, weave in end and break away.
IMAG3850

Top Tip!

IMAG3852IMAG3833 Ready to ship IMAG3825

Thank you to all my pattern testers.Thank you Michelle Jones for your quick response. Your ring turned out Lovely. xx


You can also watch a video tutorial by clicking here.
Cotton Rose ring pattern 

This pattern is being tested as of today 12th May 2012 and will be available for free on this blog very soon. 

Kind regards Haylee 


My crochet rose ring

Thursday 10 May 2012


My crochet Amigurumi  Hello kitty creations


I purchased the pattern for these cute dolls here by KandJdolls on etsy. I just change the face to make it look like hello kitty.
I cant wait to make the rest of the gang, they are so cute.


Hello kitty crochet doll Hello kitty Hello kitty crochet Bear hello kittyIMAG3771

I love them. Let me know what you think? xx